 Auto
Auto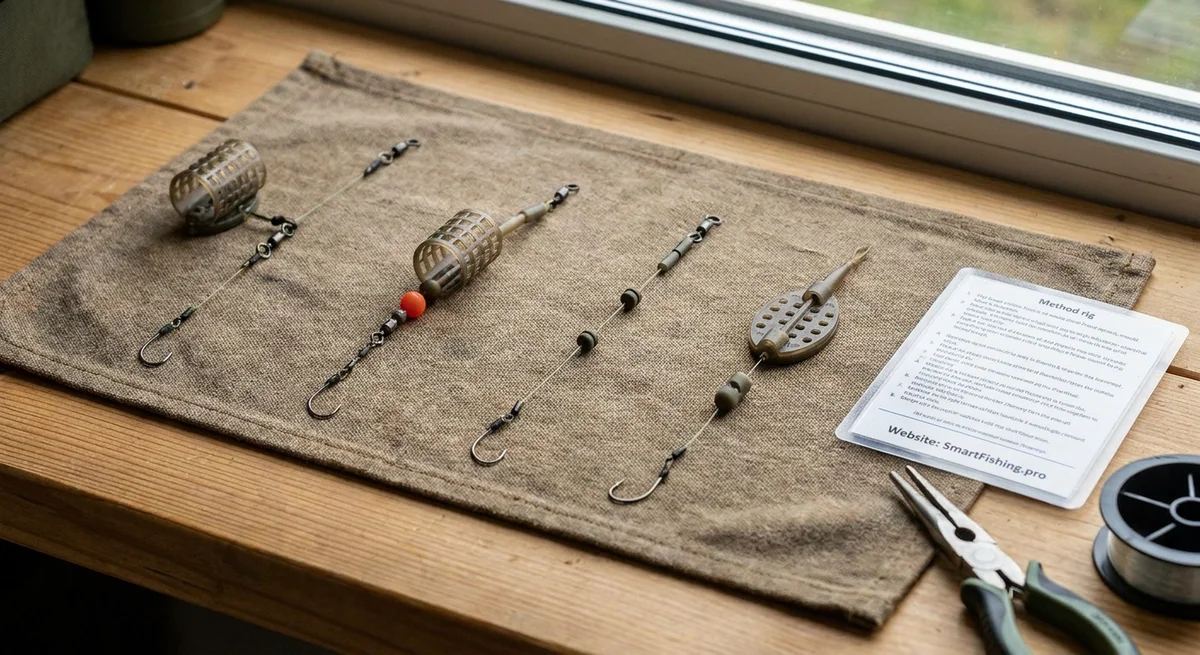
Feeder Rigs Deconstructed: Paternoster, Running, Helicopter, and Method
Scope: This guide assumes you are fishing for European common bream (Abramis brama) from the bank. If you mean North American “bream,” such as bluegill or sunfish, use smaller, lighter tackle and different hook patterns.
Bream feeder fishing looks simple: fill the feeder, cast it out, and watch the tip. But the rig controls three important things:
- Where the hookbait lands
- Whether it stays visible
- How much resistance the fish feels
Common bream feed mainly on or close to the bottom. Their food can include plant matter, detritus, small invertebrates, algae, and zooplankton. Their feeding intensity also changes during the year, so one rig should not be used in every season or on every bottom. (actavia.mendelu.cz)
The short answer is:
- Paternoster: Best all-round stillwater rig for positive bites.
- Running rig: Best when bream are cautious or moving slowly.
- Helicopter rig: Best over silt, low weed, and debris.
- Method feeder: Best when fish are feeding hard over clean, firm ground.
What Underwater Evidence Shows
There is a useful amount of underwater angling footage, but there is not a large, peer-reviewed laboratory trial comparing all four feeder rigs under identical conditions.
The clearest practical evidence comes from two sources:
- Tackle Guru’s underwater feeder series, which tests method and hybrid feeders, different hookbaits, feed mixes, and rig changes underwater. (tackleguru.com)
- Korda’s underwater filming, which shows that a helicopter rig may land on top of its own leader or mainline. This can make the hookbait much harder for a fish to pick up, even though the rig flew well and did not tangle in the air. (kordatackle.com)
That leads to an important lesson:
A rig that casts without tangling is not automatically a rig that presents well on the bottom.
A rig can land neatly but still leave the hookbait:
- Buried in silt
- Wedged in weed
- Lying across the mainline
- Trapped inside hard feed
- Sitting too close to the feeder for cautious fish
A Simple Controlled Tank Test
You can test the mechanics without putting a fish in the tank. Use:
- A clear storage box or aquarium
- 20–30 cm of water
- A 20–30 g feeder
- One identical hooklink for every test
- A size 14–16 hook
- A small piece of bright foam or artificial corn as the test bait
- Four bottom trays:
- Clean gravel
- Firm sand or clay
- Soft silt
- Sparse weed or leaf debris
For safety, either remove the hook point or use barbless hooks.
Test 1: Landing
Drop each rig from the same height. Record:
- Does the feeder land upright?
- Is the hookbait visible?
- Does the hooklink fall away from the feeder?
- Does the feeder sink into the bottom?
Test 2: Reset
Tighten the line, pull the rig 10–15 cm, then slacken it.
Watch whether:
- The hooklink moves back into a fishable position
- The hookbait stays outside the feeder
- The rig becomes trapped on the bottom
- The hook point turns away from the bait
Test 3: Tangle
Make several short casts into the tank or lower the rigs while moving them sideways. Inspect the rig after each drop.
Score each result from 0 to 2:
- 0: Poor
- 1: Usable
- 2: Very good
Expected Tank-Test Pattern
| Rig | Landing and reset | Tangle risk | Hookbait masking | Best bottom |
|---|---|---|---|---|
| Paternoster | The side branch usually holds the hooklink away from the feeder on firm ground | Medium | Medium on soft or weedy ground | Gravel, clay, firm sand |
| Running | The feeder settles while the line slides freely | Low to medium | Low on clean ground; higher with a very long link | Clean or lightly soft bottom |
| Helicopter | The hooklink slides up the line during descent and settles above the feeder | Low in the air, but presentation can be unpredictable | Low on soft ground if set correctly; high if it lands on the leader | Silt, low weed, leaf debris |
| Method | The flatbed lands feed-side up and the bait appears as the feed breaks down | Very low | Deliberately masked at first; can stay hidden if overpacked | Hard or firm ground |
These are mechanical expectations, not invented catch-rate figures. The most important checks are whether the hookbait is visible and whether the rig remains safe if the mainline breaks.
The Paternoster Rig
The paternoster places the feeder on a short side branch while the hooklink sits above it.
Rod
 |
Mainline
 |
Paternoster knot
 |\
 | \ Hooklink and hookbait
 |
Feeder branch
 |
Feeder
It is one of the most useful rigs for bream on still waters. A classic bream feeder guide reports that the paternoster can give more positive bites than a running ledger, especially when bream are feeding on still water. (thewarrenfishery.co.uk)
How It Works
When the line is tight, the feeder branch points back toward the rod. The hooklink hangs away from the feeder.
When a bream picks up the bait and moves away, the branch can slacken. This reduces the amount of feeder resistance the fish feels. The result is often a slower, more confident pull on the quivertip instead of a few sharp taps. (thewarrenfishery.co.uk)
Pros
- Very good bite detection
- Good for open-ended feeders
- Places the bait close to the feed
- Works well on firm bottoms
- Easy to change hooklinks
- Useful when bream are feeding confidently
Cons
- A large loop can tangle during the cast
- The side branch can catch weed
- A fixed version may be unsafe after a break-off
- The hookbait can settle into silt if the feeder sinks
- Less suitable for thick debris
Paternoster Build
Use these as starting dimensions:
- Mainline: 0.20–0.25 mm mono, or 0.06–0.10 mm braid with a 0.20–0.23 mm leader
- Feeder branch: 0.20–0.23 mm stiff mono or fluorocarbon
- Hooklink: 0.10–0.16 mm
- Hooklink length: 45–75 cm
- Hook size: 14–18 in winter; 12–16 in warmer months
- Feeder: 15–40 g, depending on casting distance and wind
Knot-by-Knot Build
-
Prepare the branch.
Cut 15–20 cm of 0.20–0.23 mm stiff line. -
Tie the four-turn water knot.
Lay the branch alongside the mainline. Form a loose overhand knot with both lines. Pass both lines through the knot three more times, making four turns in total. Moisten and tighten slowly. -
Leave the correct tag.
Leave the tag pointing back toward the rod. This becomes the hooklink branch. Trim the other tag to about 6–10 cm for the feeder. -
Make the hooklink loop.
Tie a small double-overhand loop at the end of the hooklink branch. -
Attach the hooklink.
Connect the hooklink loop to the branch loop using a loop-to-loop connection. -
Attach the feeder.
Tie a small feeder swivel or feeder link to the lower tag using a four- or five-turn grinner knot. -
Add an anti-tangle sleeve.
Cover the feeder-link connection with 2–3 cm of silicone tubing. This stiffens the joint and reduces wraps around the feeder. -
Check safety.
Use a feeder link that allows the feeder to separate if the rig breaks. Do not fish a closed, fixed loop over snags.
Best Use
Use the paternoster when:
- You are fishing 15–45 m
- The bottom is clean or firm
- Bream are giving slow, positive pulls
- You want strong bite detection
- You are using an open-ended cage or window feeder
The Running Rig
The running rig allows the feeder to move along the line or along a feeder link. The fish can pick up the hookbait without immediately feeling the full weight of the feeder.
Rod
 |
Mainline
 |
Sliding feeder link
 |
Bead or buffer
 |
Terminal swivel
 |
Hooklink
 |
Hookbait
A modern running feeder rig is often built with a stiff boom or feeder link. Steve Ringer’s natural-water setup uses a 0.22 mm fluorocarbon boom, a free-running feeder link, and a longer hooklink. (tackleguru.com)
How It Works
The fish takes the bait and the line moves through the feeder system. This creates less resistance than a fixed feeder.
The trade-off is that the rig may not hook the fish as aggressively. If the fish moves toward the bank, you may also get a slack-line bite. If it moves sideways, friction through the feeder link can create taps and missed bites. (thewarrenfishery.co.uk)
Pros
- Low resistance
- Excellent for shy or pressured bream
- Simple to build
- Good for long hooklinks
- Useful in winter
- Easy to use with cage, window, or plastic feeders
Cons
- Less self-hooking than a semi-fixed rig
- Can show small taps instead of full bites
- Long hooklinks can tangle
- The bait can settle deep into soft mud
- Slack-line bites are easy to miss
Running Rig Build
Starting dimensions:
- Mainline: 0.18–0.25 mm mono, or 0.06–0.10 mm braid with a leader
- Boom: 0.20–0.23 mm stiff fluorocarbon
- Hooklink: 0.10–0.16 mm
- Hooklink length: 60–100 cm
- Hook size: 14–18 for small baits; 12–16 for corn, worm, or pellet
- Feeder: 15–40 g
Knot-by-Knot Build
-
Add a leader if needed.
For braid, use a 5–8 m leader of 0.20–0.23 mm mono or fluorocarbon. An Albright-style knot or double grinner can be used. -
Thread on the feeder link.
The feeder link must slide freely on the mainline or leader. -
Add a buffer bead.
Place a rubber bead below the feeder link. This protects the terminal knot. -
Tie on the terminal swivel.
Use a four- or five-turn grinner knot. Moisten the knot before tightening. -
Create a short boom.
Twist 10–12 cm of stiff line above the feeder connection and lock it with a small overhand knot. A stiff boom kicks the hooklink away from the feeder. -
Tie the hooklink.
Make a small double-overhand loop at the hooklink end and attach it to the quick-change swivel. -
Add the hook.
Use a Palomar knot for an eyed hook, or a spade-end knot for a spade hook. -
Test the movement.
Pull the hooklink gently. The feeder link should slide without sticking.
Best Use
Use the running rig when:
- Water is cold
- Bream are mouthing the bait
- The water is clear
- Fish are pressured
- You need a long, delicate hooklink
- You are fishing short to medium range
A simple running rig is also a good first choice for a new venue because it gives natural presentation without too many parts.
The Helicopter Rig
The helicopter rig places the hooklink above the feeder. The hooklink swivel rotates around the mainline or leader.
Rod
 |
Mainline or leader
 |
Top bead or stop
 |
Hooklink swivel
 |
Bottom bead
 |
Feeder
The rig is called a helicopter because the hooklink can spin around the line during the cast.
How It Works
During the cast, the hooklink travels up the line. When the feeder reaches the bottom, the hooklink drops back toward the lower stop.
By moving the top bead higher, you can keep the hooklink above soft silt, weed, or leaf debris. This is why the helicopter system is useful on rough bottoms. (kordatackle.com)
But it has a weakness: the hooklink may land on top of the leader or mainline. Korda’s underwater filming showed this happening more than once. The bait may then be difficult for a fish to find or pick up cleanly. (kordatackle.com)
Pros
- Very good for silt and low weed
- Excellent at long range
- Low tangle risk during the cast
- Hooklink can be raised above debris
- Good with short, stiff hooklinks
Cons
- Presentation is not always predictable
- Hookbait can land on the leader
- Less direct than a paternoster
- Can be difficult to set safely
- The rig may lose hooking power if the top bead is too high
Helicopter Rig Build
Starting dimensions:
- Mainline: 0.22–0.28 mm mono, or 0.08–0.12 mm braid with a leader
- Leader: 0.20–0.25 mm mono or a safe feeder leader
- Hooklink: 0.11–0.16 mm fluorocarbon or stiff mono
- Hooklink length: 10–20 cm
- Hook size: 14–18 for maggots; 12–16 for corn or pellet
- Feeder: 25–50 g for longer casts
Knot-by-Knot Build
-
Prepare the bottom connection.
Tie a feeder swivel or feeder snap to the end of the leader with a four- or five-turn grinner knot. -
Add the bottom bead.
Slide on a soft bead or purpose-made buffer above the feeder connection. -
Add the hooklink swivel.
Use a large-eye or ring swivel so it can rotate and move freely. -
Add the top bead.
Place a second bead above the hooklink swivel. This bead must slide or release safely. -
Attach the hooklink.
Make a small loop in the hooklink and connect it to the ring swivel. -
Set the bead height.
- Firm gravel or clay: 3–6 cm above the feeder
- Light silt: 8–15 cm
- Deep silt or low weed: 15–25 cm
-
Make the safety check.
The top bead must be able to move or release if the mainline breaks. A fixed bead can leave a fish towing the feeder. Safe helicopter systems are designed to let the hooklink come free. (kordatackle.com)
Best Use
Use the helicopter rig when:
- The feeder sinks into soft silt
- The bottom has low weed or leaves
- You need extra casting distance
- A normal hooklink would bury itself
- You are using a short, slightly stiff hooklink
Do not use a helicopter rig simply because it is fashionable. First test where the hookbait actually lands.
The Method Feeder
The method feeder places the hookbait inside or beside a compact pile of groundbait or damp pellets.
Rod
 |
Mainline through feeder
 |
Swivel inside feeder insert
 |
Short hooklink
 |
Hookbait inside the feed
Flatbed feeders are designed to land with the feed uppermost. The hookbait is close to the feed and may be partly hidden until the ball begins to break down. (thewarrenfishery.co.uk)
The method feeder was originally developed for bream fishing, although modern versions are now strongly associated with carp. (thewarrenfishery.co.uk)
How It Works
The fish arrives at a small pile of feed. As it eats, the hookbait is exposed among the loose food.
The short hooklink keeps the bait close to the feeder. The weight of the feeder helps turn bites into hook-ups, especially when fish are feeding with confidence.
Pros
- Very low casting tangle risk
- Delivers feed and hookbait together
- Strong self-hooking effect
- Excellent over clean, hard bottoms
- Very accurate at short and medium range
- Good when bream are feeding hard
Cons
- Hookbait can stay buried
- Feed may be packed too hard
- The flatbed can sink into soft mud
- Heavy feeders can make a splash
- Short hooklinks can be poor for very cautious fish
- Requires more careful feed preparation
Method Feeder Build
Starting dimensions:
- Mainline: At least 0.20 mm mono or 0.06–0.10 mm braid with a leader
- Hooklink: 0.12–0.16 mm supple braid or mono
- Hooklink length: 7–12 cm
- Hook size: 12–16
- Feeder: 15–35 g
- Baits: Corn, caster, maggot, small pellet, wafter, or worm section
Drennan has used a 35 g feeder with an 18-inch 0.14 mm hooklink and a size 16 hook for bream, while other method setups use much shorter braided hooklinks and size 14–16 hooks. These are useful starting points, not fixed rules. (drennantackle.com)
Knot-by-Knot Build
-
Thread the mainline through the feeder.
The line should pass smoothly through the feeder tube. -
Tie on the swivel.
Use a four- or five-turn grinner knot. -
Seat the swivel.
Push the swivel into the feeder’s safety insert. It should be held firmly but still be able to pull free after a break-off. -
Prepare the hooklink.
Use supple braid if the hookbait will be buried in the feed. Stiff mono can spring the bait out of the feed as the mix breaks down. (thewarrenfishery.co.uk) -
Tie the hook.
Use a Palomar knot for an eyed hook. If using a hair, use a knotless knot. -
Add the bait stop.
A short hair is ideal for corn, a small pellet, or a mini wafter. -
Attach the hooklink.
Tie a small loop and connect it to the feeder swivel. -
Load the feeder.
- Press a thin layer of feed into the mould.
- Place the hookbait in the middle.
- Lay the hooklink neatly over the feed.
- Add more feed.
- Press firmly enough to survive the cast, but not so hard that it becomes a lump of concrete.
-
Check the hook point.
The feed may cover the bait, but the hook point should not be sealed under a hard plug.
Best Use
Use the method feeder when:
- The bottom is firm
- Fish are feeding actively
- You need very accurate feeding
- You are fishing up to about 40 m
- Bream are comfortable with a compact pile of feed
- You want very few tangles
Seasonal Line and Hook Guide
These are practical starting points for reservoir bream. Line diameter is more useful than breaking strain because breaking strains vary between brands.
| Season | Mainline | Hooklink | Hook size | Typical approach |
|---|---|---|---|---|
| Winter | 0.18–0.20 mm mono, or 0.06–0.08 mm braid with 0.20 mm leader | 0.10–0.12 mm; 0.12–0.14 mm for helicopter rigs | 16–18 | Running rig, light paternoster, small helicopter |
| Early spring | 0.20–0.23 mm mono, or 0.08–0.10 mm braid | 0.12–0.14 mm | 14–16 | Running or paternoster with maggot, caster, or worm |
| Late spring | 0.20–0.23 mm mono, or 0.08–0.10 mm braid | 0.12–0.15 mm | 14–16 | Paternoster or method as feeding increases |
| Summer | 0.22–0.25 mm mono, or 0.10–0.12 mm braid | 0.14–0.16 mm | 12–14 | Method or paternoster with corn, pellet, worm, or caster |
| Autumn | 0.20–0.23 mm mono, or 0.08–0.10 mm braid | 0.12–0.14 mm | 14–16 | Paternoster or running rig |
| Cold post-spawn periods | 0.20–0.23 mm mono or 0.08–0.10 mm braid | 0.11–0.14 mm | 14–18 | Small feeder, low feed, natural baits |
Do not assume that summer always means heavy feeding. One reservoir study found the lowest feeding intensity in June and July during the spawning period. Reservoir conditions and available food can change the best bait and feed level. (actavia.mendelu.cz)
For long-range bream fishing, a practical setup is around 0.08 mm braid, a long leader around 0.20–0.22 mm, a 0.22 mm fluorocarbon boom, and a 0.14–0.16 mm hooklink. Steve Ringer has reported a similar distance setup with a 0.22 mm boom and a size 12 hook. (tackleguru.com)
Rig, Distance, Bottom, and Fish-Mood Matrix
| Distance | Substrate | Fish mood | First choice | Hooklink starting point |
|---|---|---|---|---|
| 0–20 m | Clean gravel or clay | Active | Method | 7–10 cm |
| 0–25 m | Firm sand | Cautious | Running | 60–90 cm |
| 15–40 m | Clean hard bottom | Feeding steadily | Paternoster | 45–75 cm |
| 25–50 m | Gravel or firm clay | Clear water, shy fish | Running | 75–100 cm |
| 30–60 m | Light silt | Moderate feeding | Helicopter | 12–18 cm |
| Any distance | Deep silt | Bait keeps disappearing | Helicopter | 15–25 cm, bead raised |
| Any distance | Low weed or leaves | Fish feeding near cover | Helicopter | 12–18 cm |
| 0–35 m | Firm bottom | Large shoal feeding hard | Method | 7–12 cm |
| 15–45 m | Firm bottom | Many small fish | Paternoster | 30–60 cm |
| 20–50 m | Clean bottom | Cold and slow | Running | 75–100 cm |
| 20–50 m | Rough or snaggy bottom | Any mood | Safe helicopter | 10–15 cm |
How to Choose When You Arrive
Start with the bottom
Use a bare lead or empty feeder to feel the bottom.
- Sharp taps: gravel or hard stones
- Smooth dragging: sand or clay
- Heavy, sticky pull: silt or soft mud
- Sudden stop and spring-back: weed or debris
If the bottom is soft, do not automatically use a longer hooklink. A long hooklink may simply bury the bait farther from the feeder.
Start with the fish mood
If the fish are active and competing, use:
- Method feeder
- Short paternoster
- Larger hookbait
- More compact feed
If the fish are cautious, use:
- Running rig
- Longer hooklink
- Smaller hook
- Less feed
- Natural bait such as maggot or caster
Change one thing at a time
If you get taps but no fish:
- Check the hook point
- Shorten the hooklink slightly
- Try a smaller hook
- Reduce the bait size
- Change from a fixed-style rig to a running rig
If the feeder comes back with the bait buried:
- Loosen the method mix
- Use less feed
- Change to a cage feeder
- Raise the helicopter bead
- Move to firmer ground
If the rig tangles:
- Shorten the hooklink
- Use a stiffer boom
- Add an anti-tangle sleeve
- Feather the cast
- Keep the hooklink longer than the feeder branch
- Inspect every cast until the problem is solved
Final Verdict
There is no single “best” feeder rig for reservoir bream.
- Choose the paternoster when you want positive bites and good control on firm ground.
- Choose the running rig when the fish are shy, the water is cold, or you need a long natural hooklink.
- Choose the helicopter rig when silt, weed, or debris threatens to bury the bait.
- Choose the method feeder when bream are feeding hard over a clean bottom.
The most important habit is to test the rig before trusting it. Watch where the hookbait lands, check whether it stays visible, and make sure the system is safe after a break-off.
A rig that looks perfect on the bank may be completely wrong underwater.