 Auto
Auto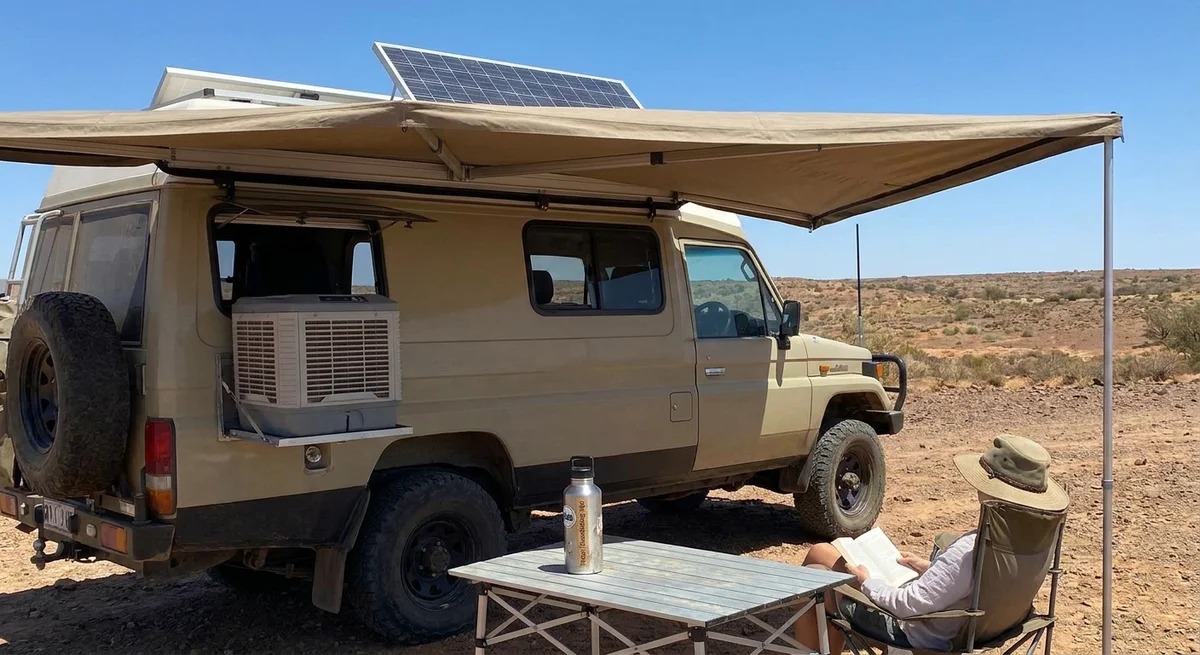
Hot-Weather Boondocking: Cooling Without Hookups
A hot RV is more than uncomfortable. Its roof, windows, walls, appliances, and furniture can absorb heat for hours, turning the interior into a slowly warming box. Without shore power, the most effective strategy is not to find one magical cooling device. It is to stop heat from entering, move hot air out, exploit cooler nighttime conditions, and reserve stored energy for the hours when passive methods are no longer enough.
This guide covers passive RV cooling, awnings, shade placement, reflective barriers, cross-ventilation, fan use, evaporative coolers, air-conditioning power demands, humidity limits, heat illness prevention, pet safety, refrigerator performance, and hot-weather boondocking site selection.
The Four-Part Cooling Strategy
Think of off-grid cooling as a sequence:
- Block solar heat with site shade, awnings, and exterior reflective barriers.
- Ventilate when outdoor air is cooler than the RV interior.
- Use fans to move air, not to overcome extreme heat.
- Use evaporative cooling or air conditioning only when the climate and available power justify it.
Building-science guidance consistently identifies shading, cross-ventilation, night flushing, and evaporative cooling as low-energy strategies—but their effectiveness depends heavily on timing, humidity, wind, and outdoor air quality. (basc.pnnl.gov)
Shade Placement: Park for the Afternoon
Shade the roof before shading the windows
The roof usually receives the most intense solar exposure, so shade over the roof can be more valuable than a small patch of shade beside the RV. If natural shade is unavailable, an awning, tarp, or freestanding shade structure can create a second roof above the actual roof.
For windows, prioritize the west and southwest sides, which receive intense afternoon sunlight when the RV has already accumulated heat. East-facing windows deserve attention in the morning. Exterior shade is generally more effective than interior curtains because it stops sunlight before it reaches the glass. (energy.gov)
A useful arrival tactic is to ask:
- Where will the sun be at 3 p.m., not merely when you arrive?
- Which side contains the largest windows?
- Which side contains the refrigerator vents?
- Will the awning shade the RV during the hottest part of the afternoon?
- Will shade trees remain safe if thunderstorms or strong winds develop?
Trees can provide excellent shade, but do not park beneath dead limbs or unstable trees. The National Park Service also warns campers to consider lightning, wind, falling branches, flash flooding, ravines, and exposed high ground when choosing a site. (nps.gov)
Use the RV’s awning as an external heat shield
Deploy the awning on the sun-facing side, especially over large windows or the sidewall that receives afternoon sun. A light-colored awning is preferable because it reflects more sunlight and absorbs less heat than a dark fabric. An awning should also have space for air to circulate between the fabric and the RV; trapping a layer of hot air against the wall can reduce its benefit. (govinfo.gov)
Use side panels selectively. They can improve shade but may also:
- Block the breeze you need for cross-ventilation.
- Turn the awning into a sail during gusts.
- Trap hot air beside the RV.
- Interfere with refrigerator ventilation.
Dometic specifically warns against installing an awning too close to the upper refrigerator vent, recommending approximately 6 to 12 inches of clearance in the cited installation guidance. Always follow the instructions for your refrigerator model. (dometic.com)
Reflective Barriers: Reflect Sunlight Before It Becomes Heat
Reflective materials work best when they face an air space and reflect radiant heat away from the RV. They are not a substitute for insulation and do not stop heat transfer through direct contact.
Best uses in a boondocking setup
- Exterior windshield covers.
- Reflective panels on west-facing windows.
- Removable panels behind skylights.
- A light-colored shade cloth above the roof.
- Reflective covers over unused windows when privacy is not needed.
- Properly installed radiant-barrier material beneath a roof or ceiling assembly.
A reflective barrier is most effective when it is not pressed tightly against a hot surface. Department of Energy guidance recommends an air space between radiant-barrier material and the roof deck, while also warning against blocking ventilation or trapping moisture. (energy.gov)
What not to do
Do not casually staple household foil to the RV ceiling, press foil directly against insulation, cover roof vents, or place reflective material near a flue, exhaust outlet, stove, or other heat source. Improvised barriers can create moisture, fire, or ventilation problems.
For short-term boondocking, removable exterior window covers are usually safer and more practical than modifying the RV roof. Use interior blackout curtains as a second layer, but remember that interior curtains block light after some solar energy has already entered the RV.
Cross-Ventilation With Fans
Cross-ventilation works when air enters on one side and exits on another. The simplest effective arrangement is:
- Low, shaded intake: a window or vent on the cooler or upwind side.
- High exhaust: a roof vent or upper window on the opposite side.
- Fan-assisted exhaust: place the fan at the highest available opening, blowing outward.
- Open path: keep interior doors, cabinet doors, and passageways from blocking airflow.
Building-science guidance recommends openings on both upwind and downwind sides to take advantage of wind pressure. Natural ventilation works best when outdoor air is cooler than indoor air and when regular breezes are available. (basc.pnnl.gov)
Daytime ventilation
During the day, use a thermometer inside and outside the RV. If the outside air is hotter than the interior, opening every window may make the RV warmer. In that situation:
- Close sun-facing windows.
- Keep reflective barriers deployed.
- Vent only the hottest roof or ceiling space if possible.
- Reopen windows when the outside temperature falls below the indoor temperature.
Night flushing
Night flushing is one of the most valuable no-hookup techniques in dry climates. Open shaded windows, run the roof fan on exhaust, and flush the RV with cooler nighttime air. Begin when the outside temperature and dew point are favorable, then close windows and shades before morning sunlight reverses the temperature advantage.
Night ventilation is especially useful where nights are cool and breezy. It is less valuable in humid locations where nighttime air remains warm and damp. Do not use open-air ventilation during wildfire smoke, dust events, or poor air-quality conditions. (bsesc.energy.gov)
Important fan safety
Fans create a cooling sensation by increasing evaporation from skin, but they do not lower the room temperature. The CDC advises using fans indoors only when temperatures are below 90°F; above that, a fan can increase body temperature rather than protect against heat illness. The National Weather Service likewise warns against directing portable fans at people when room temperatures exceed 90°F. (cdc.gov)
In extreme heat, use fans primarily to:
- Exhaust hot air.
- Move air through the RV.
- Support an evaporative cooler.
- Improve comfort in a shaded, cooler zone.
Do not treat a fan as a substitute for air conditioning when the interior is dangerously hot.
Power Demand: Air Conditioning Versus Evaporative Cooling
The difference in electrical demand is substantial.
A typical 13,500-BTU rooftop RV air conditioner may draw approximately 12.4 amps for the compressor plus 2.5 amps for the fan at 115 volts, which is roughly 1.7 kilowatts while running. Other 13,500-BTU RV air conditioners list total running demand around 13.8 amps, or approximately 1.6 kilowatts. (media.dometic.com)
By contrast, portable evaporative coolers commonly use a few hundred watts. One 745-CFM unit lists 250 watts, while a larger 3,500-CFM portable cooler lists 260 watts. These are manufacturer examples, not universal values, but they show the scale of the difference. (honeywellaircomfort.com)
Approximate eight-hour energy comparison
| Cooling method | Approximate running demand | Energy for 8 hours | Ideal 12-volt battery equivalent |
|---|---|---|---|
| 13,500-BTU rooftop AC | 1.6–1.7 kW | 12.7–13.7 kWh | About 1,060–1,140 Ah |
| Portable evaporative cooler | 250–260 W | 2.0–2.1 kWh | About 167–173 Ah |
| 12-volt roof fan, using a 2-amp service example | About 24 W | 0.19 kWh | About 16 Ah |
The battery figures are ideal calculations using amp-hours ≈ watt-hours ÷ 12. Real-world requirements are higher because of inverter losses, wiring losses, battery reserve, and the fact that most battery systems should not be completely discharged.
A rooftop air conditioner also has a large startup surge. One Dometic 13,500-BTU unit lists locked-rotor compressor current of approximately 52 to 68 amps, and Dometic lists a 3.5-kilowatt minimum generator size for one unit in its technical documentation. The startup surge is brief, but it is why a small inverter or generator may run fans yet fail when the compressor starts. (media.dometic.com)
What the numbers mean in practice
- Fans are usually battery-friendly.
- Evaporative coolers can be practical on a moderate battery bank, especially for spot cooling.
- Rooftop air conditioning is generally a generator, shore-power, or very large battery-and-solar proposition.
- An AC running continuously for eight hours can consume more than 13 kilowatt-hours, before accounting for the rest of the RV.
- A 250-watt evaporative cooler can use roughly 2 kilowatt-hours over the same period, but only if humidity is low and water is available.
For solar planning, replacing 13 kilowatt-hours of AC consumption would require several kilowatts of solar capacity under ideal conditions, and more under real-world conditions. Passive measures are therefore not just comfort upgrades; they are the difference between a manageable electrical load and an impractical one.
When Evaporative Cooling Works
A direct evaporative cooler passes air through wet media. Water evaporates into the air, taking heat with it. The process lowers dry-bulb temperature but raises humidity.
The theoretical limit is the entering air’s wet-bulb temperature. A typical direct evaporative cooler may achieve roughly 70% of the available dry-bulb-to-wet-bulb temperature difference, depending on the media, airflow, maintenance, and design. (basc.pnnl.gov)
Practical humidity thresholds
These are useful field rules rather than absolute engineering limits:
| Outdoor relative humidity | Expected performance | Boondocking advice |
|---|---|---|
| Below 30% RH | Excellent potential | Evaporative cooling is often highly effective. |
| 30–50% RH | Useful to good | Can work well, especially above 90°F, but expect less temperature drop as humidity rises. |
| 50–60% RH | Marginal | Useful for spot cooling, but whole-RV comfort may be disappointing. |
| Above 60% RH | Generally poor | Use fans, shade, or refrigeration-based AC instead. |
| Near 100% RH | Essentially ineffective | The air is already close to saturation, so little evaporation can occur. |
The difference can be dramatic. PNNL gives an example of 100°F air at 10% RH entering a roughly 70%-effective evaporative cooler and leaving at about 73°F, a 27°F drop. At 95°F and 50% RH, the same type of cooler may deliver approximately 84°F air, an 11°F drop. (basc.pnnl.gov)
A better test than relative humidity alone is the wet-bulb depression:
- Less than about 10°F: expect little useful cooling.
- About 10–20°F: modest cooling.
- More than 20°F: worthwhile evaporative potential.
Do not operate a direct evaporative cooler in a sealed RV
A direct evaporative cooler must be supplied with outdoor air and must have a way for humid air to leave. If the RV is sealed, humidity accumulates and the cooler becomes progressively less effective.
Use a cracked window or vent on the opposite side as an exhaust path. Watch interior relative humidity with a hygrometer. If the cabin becomes persistently damp—roughly above 60–65% RH—stop using the cooler for whole-RV cooling. High indoor moisture can contribute to condensation and biological growth concerns. (epa.gov)
Evaporative cooling also consumes water. The University of Florida notes that evaporating one gallon of water removes approximately 8,100 BTU of heat. A system removing 10,000 BTU per hour entirely through evaporation would therefore require about 1.23 gallons of water per hour, although small portable coolers may remove far less heat than that. (edis.ifas.ufl.edu)
Choosing a Cooler Boondocking Site
Look for a breeze corridor
A good cooling site is not necessarily the most exposed site. You want air movement without dangerous wind.
Look for:
- A broad valley aligned with the prevailing wind.
- An open bench or slope with airflow.
- A site near, but not directly in, a water-breeze corridor.
- Clear space on at least two sides of the RV.
- A position where windows can face upwind and downwind.
Mountain and valley breezes often follow a daily cycle: slopes heat during the day and generate upslope or up-valley flow; after sunset, cooled air drains downslope and down-valley. NOAA weather-training material describes this daytime valley-breeze and nighttime mountain-breeze pattern. (weather.gov)
Avoid placing the RV directly in a narrow gap or saddle unless you have checked the forecast. Wind can accelerate through gaps, and exposed ridges can bring stronger gusts, lightning, and difficult awning conditions. The National Park Service advises avoiding high peaks and ledges during storms because of wind and lightning exposure. (nps.gov)
Gain elevation—but not recklessly
In the standard atmosphere, temperature decreases roughly 3.5°F per 1,000 feet of elevation gain, although actual conditions vary with weather, humidity, terrain, and inversions. A campground 2,000 feet higher may therefore be several degrees cooler, but it is not guaranteed. (weather.gov)
Higher sites may provide:
- Cooler afternoon temperatures.
- Cooler nighttime sleeping conditions.
- Better exposure to prevailing wind.
- Relief from hot valley floors.
They may also bring:
- Stronger wind.
- Lightning exposure.
- Rapid weather changes.
- Colder nights.
- Altitude-related health problems.
- Poorer cell service or longer emergency access.
Death Valley National Park, for example, recommends higher-elevation campgrounds as a way to escape the extreme heat of the valley floor, but also warns about summer travel risks and limited services. (home.nps.gov)
Use the diurnal temperature swing
Dry desert climates often have large day-night temperature differences, while humid climates tend to have smaller swings. A site with a forecast afternoon high of 100°F and a nighttime low of 65°F offers a strong opportunity for night flushing. A site that remains 85°F overnight offers very little passive relief. (meted.ucar.edu)
As a practical planning rule:
- 15°F or more of nighttime cooling: night ventilation is often valuable.
- 25°F or more: passive cooling can carry much of the night and delay morning AC use.
- Less than 10°F: prioritize shade, refrigeration-based cooling, or relocation.
Do not choose the absolute lowest point in a valley simply because it feels cooler after sunset. Cold air drainage can create fog and dampness, while ravines and low channels can become dangerous during storms or flash floods. A slightly elevated bench near the valley airflow is often a better compromise. (preview.weather.gov)
Heat Illness Prevention
Cooling the RV is not just about comfort. Heat exhaustion and heat stroke can develop quickly, particularly in older adults, young children, people with chronic conditions, and anyone working or exercising in the heat. The CDC recommends staying cool, hydrating, taking breaks, and recognizing symptoms such as heavy sweating, weakness, headache, nausea, dizziness, and shortness of breath. (cdc.gov)
A practical daily routine
- Schedule hiking, setup, repairs, and strenuous work for early morning or evening.
- Drink regularly rather than waiting until you are intensely thirsty.
- Wear loose, light-colored clothing.
- Take frequent breaks in shade or an air-conditioned location.
- Use a thermometer and hygrometer inside the RV.
- Monitor local heat-risk forecasts and air quality.
- Avoid alcohol during the hottest part of the day.
- Keep an emergency plan for reaching a cooling center, clinic, or town.
Confusion, slurred speech, seizures, loss of consciousness, or very hot skin are emergency warning signs of heat stroke. Call 911, move the person to a cooler location, remove excess clothing, and begin rapid cooling while awaiting medical help. (cdc.gov)
If the RV remains dangerously hot despite shade and ventilation, relocate. A day without hookups is not worth attempting to endure a dangerous heat event, especially with vulnerable occupants.
Pet Safety in Hot Weather
Pets are particularly vulnerable because dogs and cats have limited cooling mechanisms compared with humans. Risk increases for flat-faced breeds, overweight animals, older pets, animals with heart or breathing problems, and pets that are not acclimated to heat. (healthtopics.vetmed.ucdavis.edu)
Essential pet rules
- Never leave a pet unattended in a parked vehicle.
- Do not assume cracked windows make a vehicle safe.
- Do not leave a pet alone in a hot, passively cooled RV.
- Provide shade, fresh water, and a cool resting surface.
- Walk during the coolest parts of the day.
- Check pavement before walking; hot asphalt can burn paw pads.
- Never force exercise during extreme heat.
- Keep a backup plan for transporting the pet to air conditioning.
The safest rule is simple: passive cooling is not a reliable pet-sitting system. If a pet must remain inside an RV, the climate-control system should be powered, tested, monitored remotely, and backed by an alarm and a contingency plan. Even then, leaving the pet in a hot RV should be avoided whenever possible.
Warning signs include excessive panting, heavy drooling, weakness, wobbling, vomiting, diarrhea, confusion, difficulty breathing, collapse, or seizures. Move the animal to a cool shaded area and contact a veterinarian or emergency veterinary clinic immediately. Veterinary guidance generally favors cool—not ice-cold—water and prompt professional care. (healthtopics.vetmed.ucdavis.edu)
Keeping the RV Refrigerator Efficient
Hot weather is hard on RV refrigerators, especially absorption refrigerators, which must reject heat through the outside refrigerator compartment. Dometic notes that performance can begin to suffer as ambient temperatures rise above approximately 95°F, and recommends shade, limited door opening, and additional rear ventilation in hot climates. (support.dometic.com)
Protect the refrigerator from heat
- Park with the refrigerator side in shade if possible.
- Keep the lower intake and upper exhaust vents unobstructed.
- Do not cover refrigerator vents with reflective material.
- Keep awnings and shade structures clear of the upper vent.
- Clean dust and dirt from exterior vents and condenser areas.
- Consider an OEM or properly installed refrigerator ventilation fan kit.
- Keep the RV level, especially with absorption refrigerators.
Absorption refrigerator installations depend on a chimney-like airflow pattern: cooler air enters low, moves across the cooling unit, and hot air exits high. Baffles and proper clearances prevent hot-air pockets from forming behind the refrigerator. (dometic.com)
Reduce the refrigerator’s workload
- Turn the refrigerator on approximately 12 hours before loading it.
- Load pre-chilled food whenever possible.
- Do not put hot food directly inside.
- Keep the door closed except when actively removing food.
- Avoid overfilling shelves.
- Leave clearance around cooling fins and internal vents.
- Use a refrigerator thermometer rather than relying on how cold the air feels.
- Defrost when frost begins restricting airflow.
Dometic recommends pre-cooling products, avoiding direct sunlight, keeping vents unobstructed, maintaining internal air circulation, and minimizing door-open time. (support.dometic.com)
A Hot-Weather Boondocking Playbook
Before arrival
- Check the hourly temperature, dew point, wind direction, smoke, and overnight low.
- Identify higher-elevation alternatives.
- Pack reflective window covers, a hygrometer, extra drinking water, and fan screens.
- Confirm the generator or inverter can handle AC startup surge if air conditioning is part of the plan.
On arrival
- Walk the site before setting up.
- Identify afternoon shade, refrigerator orientation, wind direction, and dead branches.
- Position the RV for shade at the hottest time of day.
- Keep the refrigerator vents clear.
- Deploy the awning on the sun-facing side.
- Install exterior window barriers before the RV heats up.
During the afternoon
- Keep sun-facing windows covered.
- Run only the fans needed to remove accumulated heat.
- Use an evaporative cooler only when humidity is low and exhaust is available.
- Limit cooking, baking, and other heat-producing activities.
- Move people and pets to air conditioning if indoor temperatures become unsafe.
After sunset
- Measure indoor and outdoor temperatures.
- Open shaded windows if outside air is cooler.
- Run the roof fan on exhaust to flush hot air.
- Use the cooler nighttime air to reduce the RV’s stored heat.
- Close windows and shades before morning sunlight begins heating the RV.
Conclusion
Successful hot-weather boondocking without hookups is mostly an exercise in timing and heat management. Park for afternoon shade, not morning appearance. Keep the roof and west-facing windows out of direct sun. Use light-colored awnings and reflective barriers with proper air gaps. Ventilate through upwind and downwind openings when outdoor air is cooler, and use roof fans for exhaust rather than relying on them as emergency personal cooling.
Evaporative coolers can deliver impressive results below roughly 30–40% relative humidity, but their performance falls quickly as humidity rises and they add moisture to the RV. Air conditioning is far more reliable across climates, but a typical rooftop unit can demand 1.6 to 1.7 kilowatts while running, plus substantial startup surge.
Finally, treat human safety, pet safety, and food refrigeration as hard limits. If shade, ventilation, and available power cannot keep the interior safe, the correct boondocking strategy is not to endure the heat—it is to relocate, run an appropriate cooling system, or find air conditioning.